Deathwing Update
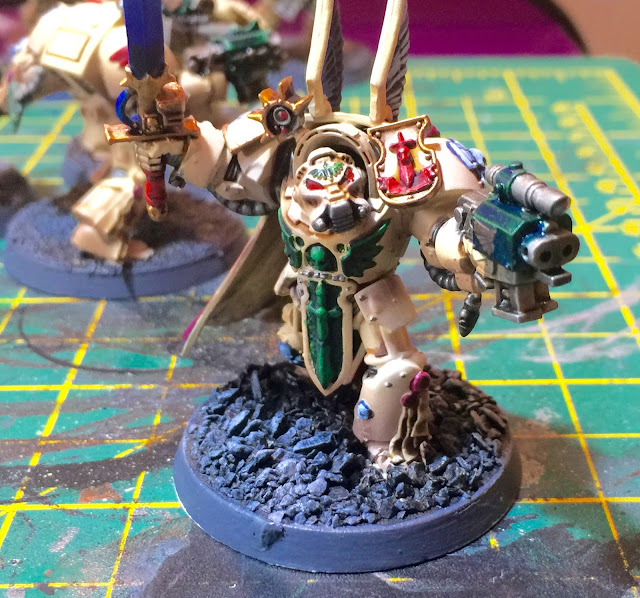
Made some great progress today and managed to complete my final Deathwing terminators.
I'll do a team photo at some point in the future but for now here's a few shots of the finished models:
I've also made some great progress on the Land Raider crusader...let's see if you can spot the difference...
So here's the run down of the technique in order:
A) Bone Shading
1) Whole model is primed in white
2) Apply Tamiya Flat Earth on the darkest areas (bottom of model, recesses and the tops of any diagonal surfaces (these get lighter at the bottom)
3) Apply Vallejo air Light Brown over the WHOLE model - this is the mid ton colour - the model will look quite yellow
4) Vallejo Model Air Sand is applied to the lightest areas - this will include the top surfaces, tops of the sides and bottom of diagonal surfaces
B) Green Shading:
1) Prime in black
2) apply ever increasing grey shades working from black to the lightest grey. I used Vallejo Model air: Dark Sea Grey, Cold Grey, Stone wall grey...you can go one lighter but I didn't bother
3) Apply VMA (Vallejo Model Air) Dark Green over the whole area; thin coats, 2-3 coats
4) Apply VMA Black green to accentuate the dark areas
5) Apply VMA Midori Green to highlight the lighter areas - make sure you leave some of the dark green in the middle to create a decent blend
6) Apply Purple wash (yes purple) to the dark areas...it does an amazing thing to the green!
C) Model is basically completely shaded and highlighted so now black out any parts that you intend to colour - i.e. metallic areas, lenses, windows, tracks (normally tracks would not be on for ease)
D) Coat the whole model in a gold varnish. For ease I used Humbrol clear in the airbrush - this preps the surface for applying transfers
E) Apply transfers using micro set, then cover each one with Micro sol.
F) - NOW LEAVE OVER NIGHT FOR TRANSFERS TO CURE...this is where I am up to now.
Rest of the tutorial will follow in due course.
I'll do a team photo at some point in the future but for now here's a few shots of the finished models:
 |
| I converted Captain Karlean who is a Blood Angels Terminator captain, into a new Deathwing sergeant. Pretty happy with the conversion and with his rather regal cloak |
 |
| The former Captain Karlean from the front - I love the pose of this terminator model - notice the Grey night Power sword that had to replace the Thunder Hammer |
 |
| Subtle Shading on the shoulder pad, and heat bloom on the assault cannon |
 |
| I've finally been able to use the airbrush on a power weapon, but kept it simple |
 |
| As per my previous post the new decal sheets from GW for Dark Angels have got some fantastic decals. I'm also really pleased with how the bone, and the green blending worked out |
 |
| I may have got excited with the decals....they are just so good! |
A) Bone Shading
1) Whole model is primed in white
2) Apply Tamiya Flat Earth on the darkest areas (bottom of model, recesses and the tops of any diagonal surfaces (these get lighter at the bottom)
3) Apply Vallejo air Light Brown over the WHOLE model - this is the mid ton colour - the model will look quite yellow
4) Vallejo Model Air Sand is applied to the lightest areas - this will include the top surfaces, tops of the sides and bottom of diagonal surfaces
B) Green Shading:
1) Prime in black
2) apply ever increasing grey shades working from black to the lightest grey. I used Vallejo Model air: Dark Sea Grey, Cold Grey, Stone wall grey...you can go one lighter but I didn't bother
3) Apply VMA (Vallejo Model Air) Dark Green over the whole area; thin coats, 2-3 coats
4) Apply VMA Black green to accentuate the dark areas
5) Apply VMA Midori Green to highlight the lighter areas - make sure you leave some of the dark green in the middle to create a decent blend
6) Apply Purple wash (yes purple) to the dark areas...it does an amazing thing to the green!
C) Model is basically completely shaded and highlighted so now black out any parts that you intend to colour - i.e. metallic areas, lenses, windows, tracks (normally tracks would not be on for ease)
D) Coat the whole model in a gold varnish. For ease I used Humbrol clear in the airbrush - this preps the surface for applying transfers
E) Apply transfers using micro set, then cover each one with Micro sol.
F) - NOW LEAVE OVER NIGHT FOR TRANSFERS TO CURE...this is where I am up to now.
Rest of the tutorial will follow in due course.


Comments
Post a Comment